Understanding Nuke's '.nk' file structure
March 4, 2025

Kasimir Malevich, Stroyuschiysya dom [House under construction], 1916
Recently as a small side-project, I attempted to build a next-node prediction model for Nuke—a plugin that would analyze compositing scripts to identify common node patterns and automatically suggest next nodes to add to your scene.
For training, I needed to parse numerous Nuke scripts, flatten any groups or gizmos, and reconstruct their node structures in a PyTorch-compatible format. While I could have launched Nuke for each script and used its Python API to extract the graph structure, it was quite a bit more efficient to directly parse the '.nk' files themselves.
After all, the '.nk' files are human-readable TCL scripts that contain all the structural information I needed. After wrapping my head around the structure and a lot of trial-and-error, I built a lightweight parser that could generate training examples without the overhead of launching any Nuke processes.
If you're looking for an off-the-shelf nuke script parser, take a look at Max Wiklund's implementation here. For those interested in understanding how Nuke scripts work under the hood, let's dive into their structure.
Anatomy of a Nuke File
Header Section
Each .nk file begins with something like this:
version 14.0 v5
define_window_layout_xml {<layout>...</layout>}
Root {
 inputs 0
 name /path/to/your/project.nk
 frame 1001
 ...
}
The header section defines:
- The Nuke version used to create the file.
- Layout information for the Nuke interface.
- Defines this as an XML representation.
- Ensures panel configurations, window positions, etc. are consistent when launching the script.
- Root node settings (frame-range, resolution, whatever else)
- If the script is saved as a 'LiveGroup', this will be replaced by a 'LiveGroupInfo' struct.
Node Definitions
After the header, you'll find individual node definitions. Each node is defined with its type followed by curly braces that contain any non-default parameters.
Read {
 inputs 0
 file_type jpeg
 file /path/to/image.jpg
 format "1920 1080 0 0 1920 1080 1 HD"
 origset true
 name Read1
 xpos 180
 ypos -34
}
Key elements to look out for:
- Node Class: (e.g. Read, Merge, ColorCorrect)
- Retrievable via
node_instance.Class()in Nuke Python API.
- Retrievable via
- inputs: Defines the number of inputs for the node.
- Node definitions do not specify outputs.
- This is handled by the group stack (to be explained below)
- You may encounter values like:
inputs 3+1- Indicates additional inputs of a node are being used.
- (Like the 'A2', 'A3', or 'mask' inputs of a Merge node.)
- Node Parameters: Defines other parameters for the node.
- Not all parameters are explicitly defined in the script!
- Some parameters might not be defined if they have default values.
- You can check if a knob's default value with:
knob.defaultValue() - Or for a simpler boolean check:
knob.notDefault(). - To force a knob to always write to disk, use
knob.setFlag(nuke.ALWAYS_SAVE)
- You can check if a knob's default value with:
- name: The node's name within the current group.
- Equivalent to
node_instance.name(), notnode_instance.fullName
- Equivalent to
- xpos/ypos: The node's location.
How Node Connections Work
While node definitions specify the number of inputs a node has, they don't explicitly define which nodes connect to these inputs. Instead, connections between nodes are defined by the order in which nodes appear in the '.nk' file.
Nuke maintains a group connection stack, pushing each node onto the stack after processing it.
Connection rules:
- Nodes are processed in the order they appear in the file (top to bottom).
- When a node is processed, it is pushed onto a connection stack for the current group.
- When a subsequent node with inputs > 0 is processed, it connects to the most recent N nodes on the stack, where N is the number of inputs.
If it's not making immediate sense, try working through the simple example below:

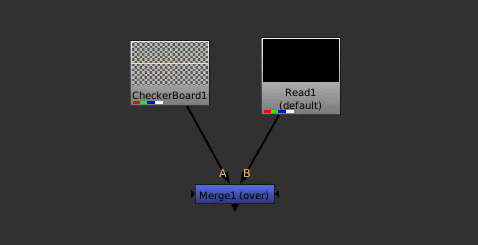
CheckerBoard2 {
 inputs 0
}
Read {
 inputs 0
}
Merge2 {
 inputs 2
}
- Start at
CheckerBoard2. Stack is[].- Nothing is connected. Add
CheckerBoard2to the stack.
- Nothing is connected. Add
- Continue to
Read. Stack is[CheckerBoard2]- Nothing is connected.
- Push
CheckerBoard2back and addRead.
- Continue to
Merge2. Stack is[Read, CheckerBoard2]- Defines two inputs.
- Input A connects to the most recent node:
Read - Input B connects to the next node:
CheckerBoard2 - Add
Merge2to the stack.
- Stack is now
[Merge2]
set/push syntax
The basic example above works great for simple scripts! We can easily place nodes onto the stack and then pop them off, building linear chains of nodes all the way down.
But what happens when we want to merge in a separate branch from another part of the node graph? Those nodes have already been added and removed from the stack! The flat-structure described above won't cut it.
This is where the set and push keywords allow Nuke to store previously processed Nodes as variables and push them
back onto the stack as needed. This allows the script to "remember" previously processed nodes, connecting them back
up as needed.
set
Stores the previously processed node under a variable name.
set Neb1d4400 [stack 0]
set: keywordNeb1d4400: variable name, later referenced with$prefix.[stack 0]: location on the stack to push the node, in this case at the top:stack 0.
push
Push the node associated with the variable back onto the stack.
push $Neb1d4400
push: keyword$Neb1d4400: Looks up the node associated withNeb1d4400and pushes it back onto the stack.
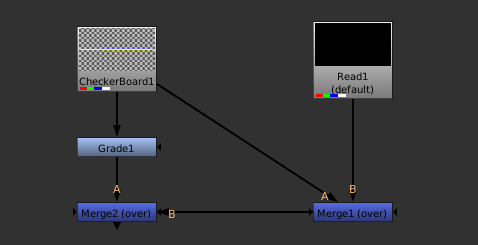
Let's work through an extended example below:

CheckerBoard2 {
 inputs 0
}
set Neb1d4400 [stack 0]
Grade {
}
push $Neb1d4400
Read {
 inputs 0
}
Merge2 {
 name: Merge1
 inputs 2
}
Merge2 {
 name: Merge2
 inputs 2
}
- Start at
CheckerBoard2. Stack is[].- Nothing is connected. Add
CheckerBoard2to the stack.
- Nothing is connected. Add
- Read the
set Neb1d4400 [stack 0]line.- Store
CheckerBoard2under theNeb1d4400variable. - Continue parsing, do not alter stack.
- Store
- Continue to
Grade. Stack is[CheckerBoard2]- No
inputsdefined? Safe to assume it has only 1 input if not explicitly defined. - Pop
CheckerBoard2and connect as the only input. - Push
Gradeonto the stack.
- No
- Read the
push $Neb1d4400line.- Pushes the
$Neb1d4400variable back onto the stack. - Remember
CheckerBoard2was stored under this variable on #2.
- Pushes the
- Continue to
Read. Stack is[CheckerBoard2, Grade]- Nothing is connected.
- Push
Readonto the stack.
- Continue to next node, named
Merge1. Stack is[Read, CheckerBoard2, Grade]- Defines two inputs.
- Input A connects to the most recent node:
Read - Input B connects to the next node:
CheckerBoard2 - Add
Merge1to the stack.
- Continue to next merge, named
Merge2. Stack is now[Merge1, Grade]- Input A connects to the most recent node:
Merge1 - Input B connects to the next node:
Grade - Add
Merge2to the stack.
- Input A connects to the most recent node:
Note: You may encounter push 0, which is used to push an "empty" connection to the stack.
Read {
}
# Push an "empty" connection to stack.
push 0

# Stack is [empty, Read]
Merge2 {
  inputs 2
}
# Input A is empty, Input B is the Read node!
Thanks to Nuke's DAG, with a stack and the two main operations (set and push), all node relationships
are captured in relatively simple TCL syntax.
This is all you need to effectively understand a Nuke script! The rest of the post will describe some of the gotcha's and tricks when trying to build a script parser.
Group Stacks
Each stack is maintained in relation to its parent group. Each Nuke script begins with a single parent-level group
named Root. This is the first Node definition in every script (excluding LiveGroups).
Whenever the script encounters a Group or a localized LiveGroup type, a new group stack will begin.
You'll be able to tell the depth of the nested groups based on indentation prior to the Node Class name.
When the end_group keyword is encountered, the current group stack is finished.

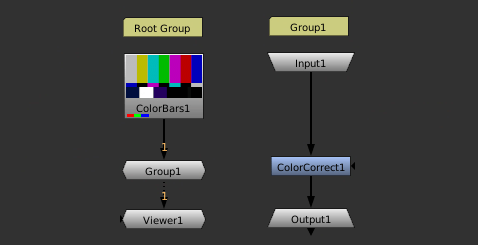
Root {
}
ColorBars {
 inputs 0
}
# Root group ends. Group1 begins.
Group {
 name Group1
}
 Input {
  inputs 0
 }
 ColorCorrect {
  saturation 2.2
  name ColorCorrect1
 }
 Output {
  name Output1
 }
end_group
# Group 1 ends. Root group resumes.
Viewer {
}
- Process
RootNode. BeginRootGroup.- Stack is [] (Root node is never added to stack.)
- Continue to
ColorBars.- Push
ColorBarsonto the root stack.
- Push
- Continue to
Group. Root stack is[ColorBars].- Pop
ColorBarsand connect it as input. - Push
Grouponto root stack. Root stack is[Group]. - Begin new stack for Group!
- Pop
- We're now inside
Group1. Continue to group'sInputnode.- Push
InputontoGroup1's stack.
- Push
- Continue to
Group1.ColorCorrect. Group stack is[Input].- Pop off
Inputand connect it. - Push
Group1.ColorCorrectonto stack.
- Pop off
- Continue to
Outputnode.- Pop off
Group1.ColorCorrectand connect it. - Push
Outputonto stack.
- Pop off
- Process
end_groupline. Indicates thatGroup1is finished!- Dispose of
Group1's stack. - Pickup the
Rootstack and continue.
- Dispose of
- Continue to
Viewer. Root stack is[Group].- Pop
Groupand connect it to the viewer.
- Pop
Troubleshooting Broken Scripts
Sometimes the Nuke script structure can get corrupted, leading to errors like:
"can't read Nbf7c9d0": no such variable
For a quick fix:
- Open up the .nk file.
- Search for the variable name, in this case
Nbf7c9d0. - You'll find a line like
push $Nbf7c9d0. - Delete that line and replace it with a NoOp:
NoOp {
}
The script should now open up without an error. The problematic node will be replaced with a
NoOp, allowing the user to fix the script manually.
This means it's trying to push a node with the variable Nbf7c9d0 onto the stack, but the set command
was never called for that variable! - Replacing the push call with a NoOp ensures the order of the stack is maintained.
Multi-line Parameters
Not all node parameters are defined on a single line. If you're attempting to implement a Nuke script parser, ensure you track brace depth to properly handle these parameters.
Roto nodes contain their complex data within the node definition and are a likely candidate
for expanding the size of your Nuke script files.
That's all! Thanks for reading.